It’s been a while! But Halloween always inspires me to sneak in some soapmaking! This time melt and pour-
BAT SOAPS


GHOST SOAPS


Halloween Soaps
Great Cakes Soapworks Challenge- Ebru
Howdy fellow soapers and others who might be reading! This month’s soap challenge was to create soap using the Ebru technique. To be honest, the hardest part was choosing a design that could be done with soap and trying not to make it overly complex. You don’t have too long to make intricate designs before soap batter starts to thicken.
I wish I had a couple more tries to make other designs I had in mind but ugh! Need more time and energy! I’m less than a month a way from my due date (yes pregnant!). But, as always, had loads of fun exploring the new technique and giving it a shot!
So here it is in the mold: 
Kitties and flowers using a single skewer.
I started with a plain blue/green background and did a little swirl (with a single skewer) on half for the background.


Then I added the kitties and flowers.


I wanted the flowers and kitties to pop out a bit to add something special to the soap. So at a little thicker trace I poured in the flowers (using ketchup/squirt bottles).
I took my inspiration from many photos but this one gave me the biggest idea for the background:

Thanks for reading and big thanks to Amy Warden for hosting another wonderful challenge! Sorry I was short and didn’t take too many pictures! I’m trying to make the deadline 🙂 and this pregnant lady needs some sleep (it’s almost 1am!). Hehe.
Posted in CP soap, soaps, Uncategorized
Another flower picture tutorial & new leopard cupcake


Thanks for looking 🙂
Posted in CP soap, Uncategorized
Thank You!
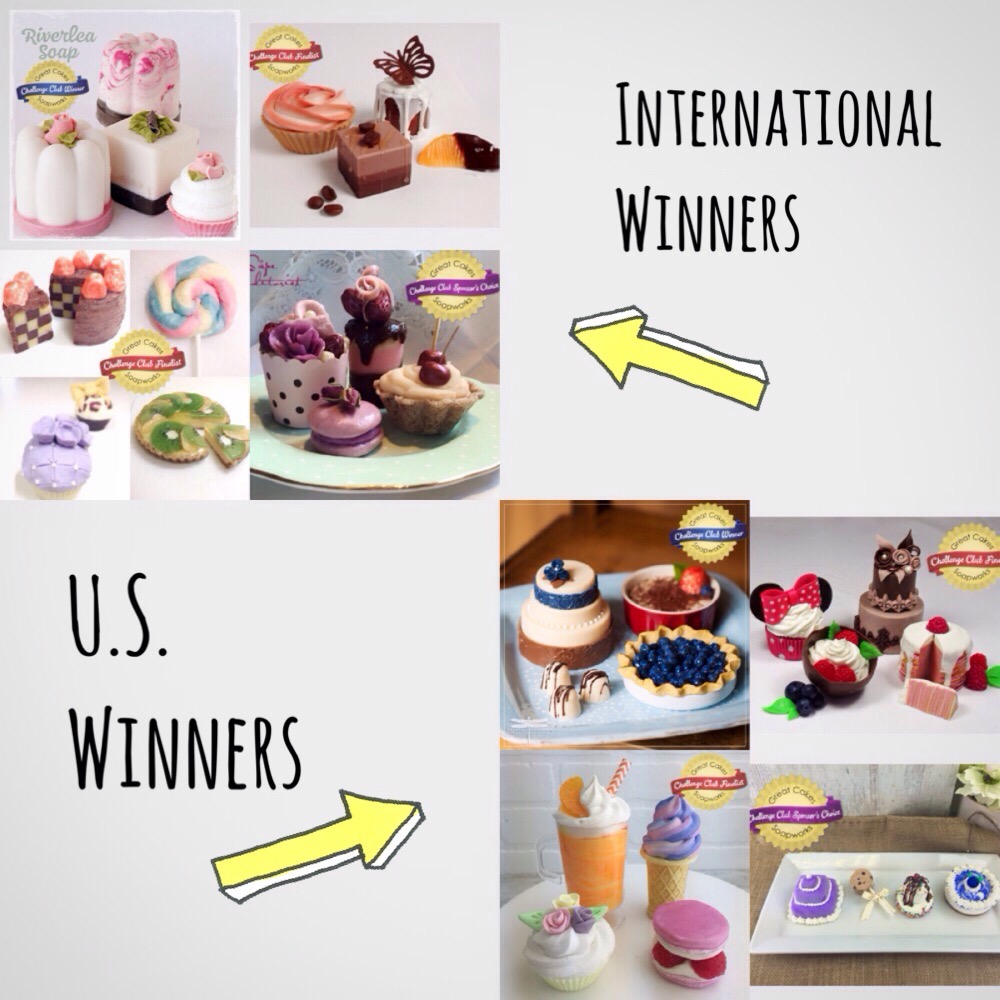
Just wanted to say thank you to all the soapers that voted for my Mini Desserts in The Great Cakes Soapworks Mini Dessert Soap Challenge! Never in my wildest dreams did I ever think that’d I’d place in a contest the carries such talent. I guess I got lucky! Thank you!
Please click the picture below to read Amy Warden’s post about it (you must see all desserts submitted! They’re incredible!):
Also check out Cee Gordon’s fun blog! She guided us soapers through the challenge with helpful tips!
❤
Posted in CP soap, soaps, Uncategorized
Flower Cupcake Soap
Here’s a little variation of a cupcake soap I made in the last blog post. 


Flowers are made of a week old CP soap! My last post shows how to make the flowers! xo
Posted in CP soap, Uncategorized
Great Cakes Soapworks Challenge- Mini Desserts

When Amy Warden announced that this month’s soap challenge was going to be mini desserts, I didn’t know how to feel. On one hand, it was foreign territory to me. On the other, there were so many techniques I was dying to try. And I knew this was going to give me the motivation to do so!
Before I begin, I wanted to say I was very inspired by many amazing dessert recipe books out there. I’ll post a separate blog about it. For this challenge, I tested many techniques presented by queen of sweets soaper, Kosaka Yukiko.
So I’m going to start by posting some pictures of my four mini dessert submissions first since the documentation of the process will probably be lengthy (and some of you might not want to read all the details). I will say that I tried incorporating many techniques such as the mp dough, cp kneading, cp whipping, etc. This challenge was four-in-one in my opinion!
Here are my desserts: 1) Checkered chocolate coffee cake, 2) Lollipop 3) Apple kiwi tart and 4) Purple pearl flower cupcake-
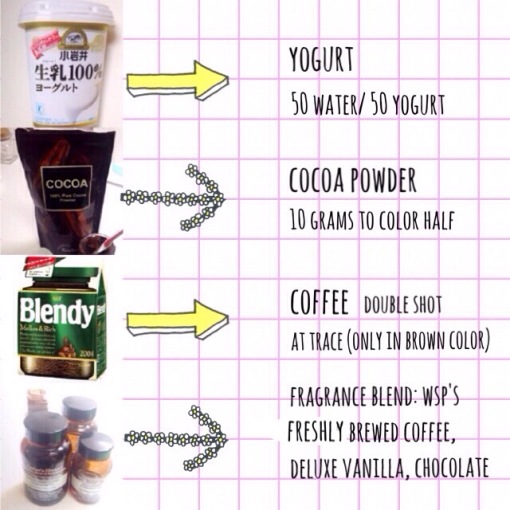
1. Checkered Chocolate Coffee Cake
(With yogurt, two shots of coffee, and cocoa powder)


2. Lollipop
(With yogurt)

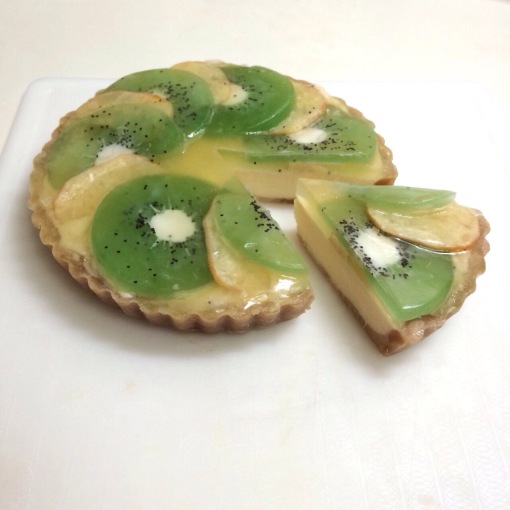
3. Apple Kiwi Tart
(With yogurt, tumeric, coffee, cocoa powder)
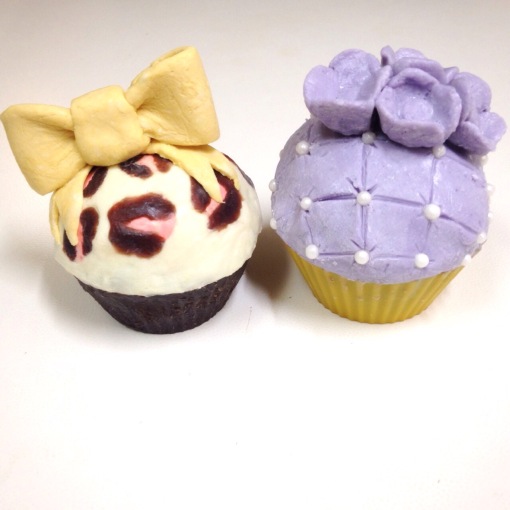
4. Purple Pearl Flower Cupcakes (With yogurt, coffee, cocoa powder, sugar)
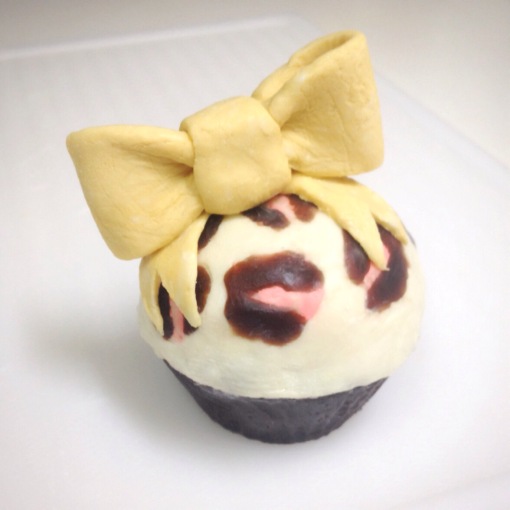
Here’s another cupcake I made- Leopard bow cupcake. (Although the purple cupcake above is part of my challenge submission).
And now for the process!
STEPS
FRUITS
I started by making the toppings aka fruits- strawberries, kiwi, and apples.

STRAWBERRIES
Strawberries were made of fondant mp soap, and dipped into mp clear soap.
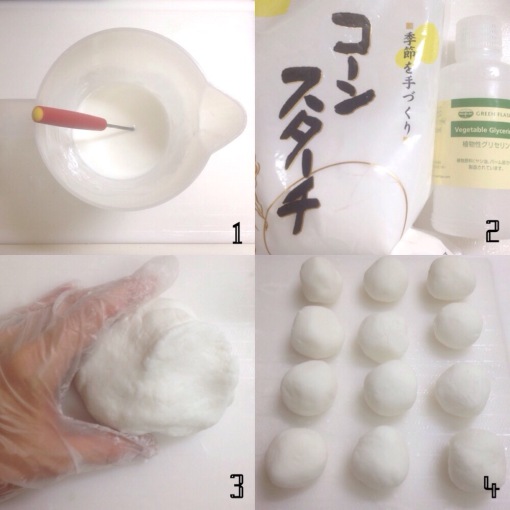 1-3. First I started by making the fondant mp soap using white mp soap, cornstarch, and glycerin. Cee Gordon, our teacher for this month’s challenge, kindly gave us a starting-point recipe. I ended up using a bit more cornstarch to get the consistency that I wanted.
4. While occasionally patting my hands with cornstarch, I rolled the fondant soap into balls (strawberry-size). 5-6. I, then, shaped each ball into a strawberry and with a skewer I poked holes into each.
7-8. Finally, dipped each strawberry into clear red mp soap.
Notes: I think I would’ve been better off molding cp soap, dipping it in red mp soap, then poking holes. The fondant mp soap was a bit too soft (cp would’ve been easier to keep shape while poking holes). Also, originally I wanted to cut the strawberries in half which is why I left the middle white (only colored the outside). But if you’re keeping them whole it might be nice to just make the strawberry completely red.
KIWI
The kiwi was made of clear mp soap, poppy seeds, and mp fondant “play dough” soap.
 1. First, I poured some green (chrome pigment scented with fruit slices, a sample I received from Peak Candles) clear melt and pour and poppy seeds in a silicone mold.
2. Then, after the chrome green mp soap hardened, I cookie cut some circles out.
3. I, then, punched out the center of these circles with a smaller circle cookie cutter.
4. With a skewer, I engraved some lines from the center outwards (as is you were drawing rays of the sun).

5-6. I took some fondant mp soap used to make the strawberries above to fill in the center holes. (Rolled then in little balls and pressed them in the holes and spread them outwards in order to see the “rays”).
7-8. Pressed some more poppy seeds right outside of the white center.
Notes: I googled kiwi images after I made these and realized the seeds shouldn’t have been scattered all over the kiwi just close to the center :)! Oopsy!

APPLE
The apple was made with a day old CP soap, tumeric and red liquid pigment.
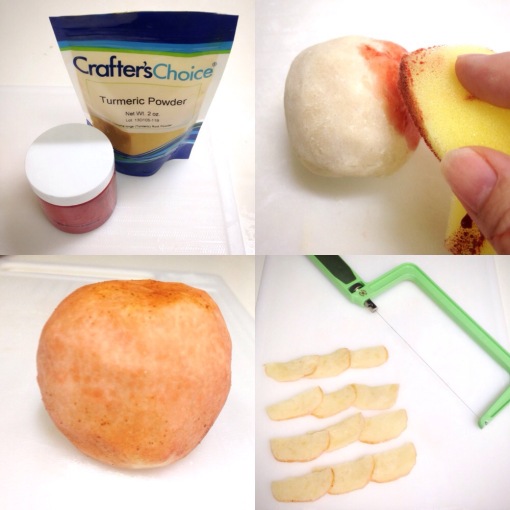 1. I rolled the day-old CP soap into the shape of an apple.
2. First, I dipped a sponge into red liquid pigment and dabbed it on the apple. Then, I dipped the sponge into tumeric (which was mixed with distilled water) and dapped it on the bottom and top part of the apple.
3. Then with a wire cutter, sliced the apple.
Chocolate Checkered Coffee Cake
 1. First, I had to find three circle cookie cutters -small, medium, and large- that were the same length/diameter apart (mine were 33mm, 63mm and 93mm).
I split my cp batter (which I added yogurt at trace) into two and colored one side dark chocolate with coffee and cocoa powder and the other with a touch of neon yellow and orange. Then, put fragrance blend in dark chocolate side only. Poured each into a silicone mold.
Day 2.
2. I used the largest cookie cutter to make two circles from each color. Made the height of each 15mm circle.
3. Then, using the medium cookie cutter, I punched a circle out of each large circle, making sure it was centered.
4. Next, used the small cookie cutter to punch a hole in each medium circle, making sure it was centered.

5. I put the pieces back together but alternating colors. (See #5 pic).
6. Then, stacked the four pieces, again, alternating colors. I made sure there weren’t any gaps between any pieces by pressing firmly but carefully and using distilled water to help glue. Of course, used gloves (lye!).
7. I put some of the remaining day-old chocolate scraps into a ziplock bag and mushed or kneaded it until it was a creamy texture. Added distilled water to help.
8. Finally, I scooped out the cream, spread it over the stack of circles, and added strawberries.
Notes: Pressing firmly and making sure there’s no gaps during step 5 and 6 is key!

Lollipop
To make this lollipop, I used 50/50 water/yogurt as my liquid. Cornstarch, distilled water, and a paintbrush came in handy.
So I split my batch four ways, colored with neons, and waited two days to start—>

1. Rolled each color into a ball to make sure texture was even and also to get an even amount of each color. I put a bit of cornstarch on my hands to help with the stickiness.
2. Then, flattened and rolled each color.
3. Pressed each colored roll together.
4. Painted distilled water on the merged roll and twisted the roll slowly and carefully.
5-6. Curled the twisted roll until in the shape of a lollipop.
And finally pushed in the lollipop stick.
Notes: This was definitely harder than it looked! It was a balance of cornstarch and water. One moment it would be too sticky and break… and other times it’d be too dry to mold. I’m thinking if I waited a few more days to knead the cp soap it might’ve been a lot easier. Also, I’m sure recipe matters as well. After a bunch of tries, though, I started getting a grip on it ;).

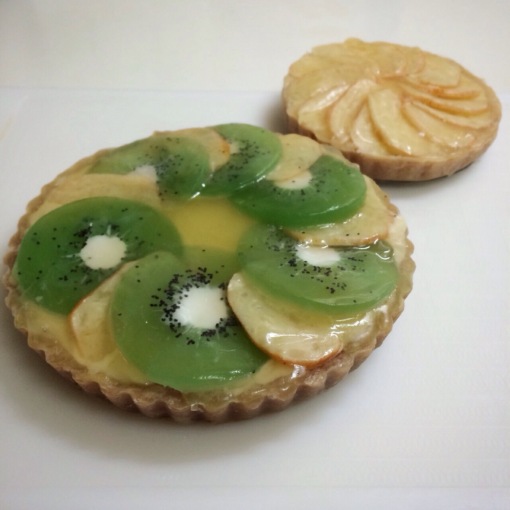
Apple Kiwi Tart
The apple kiwi tart is made of two fruit (mp kiwi and cp apple-instructions above), the crust (two-day-old cp soap), filling (cp soap), and the mp glazed topping.
CRUST
The crust is made of two-day-old cp soap which contains yogurt, cocoa powder, coffee and tumeric.

1. I wanted to go for the blotchy, graham cracker look for the crust. So I used some scraps of the dark chocolate brown two-day-old cp soap from my checkered cake as well as some yellow two-day-old cp soap from checkered cake. I took both and rolled them into one ball.
2. Then, I flattened the ball, rolled and coiled the cp batter, and put it in a mini tart pan (which was covered in saran wrap).
3. Then, I pressed firmly to cover the entire pan.
4. I lifted the crust out of the pan by carefully pulling on the saran wrap. It slipped right out!

FILLING & TOP
5. After the crust was made, I poured fresh cp soap on top at thick trace.
6. By the time I gathered the kiwi and apple slices, the filling was ready to be topped. I alternated between the kiwi and apple slices.
7-8. Then, I poured a coating of lightly colored clear, yellow mp soap on top to get that glazed look.
And the apple tart in the background was made from leftovers ;).
Notes: I shouldn’t have released the crust from the pan until the end! That way, if the mp soap coating drizzled off the edges, I wouldn’t have to peel it off the crust :).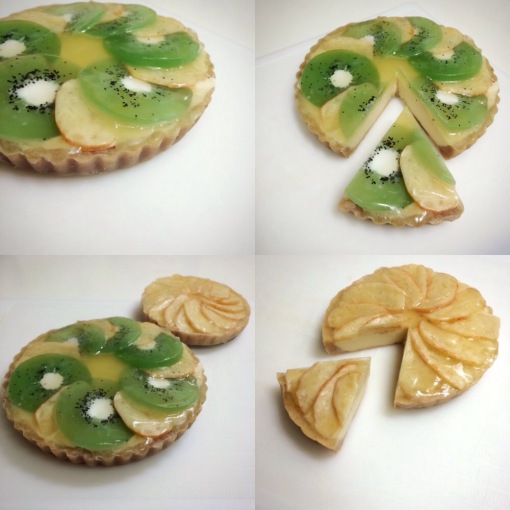
CUPCAKES
The base of the cupcakes were made from the dark brown scraps from the checkered cake which included coffee, cocoa powder, and yogurt. The icing was made of leftover lollipop batter which included yogurt. Side note: by now the scraps were about 5 days old and molded much better than the one-two day old soap.
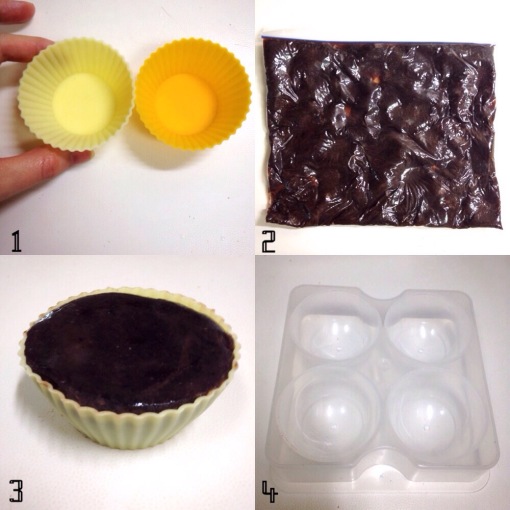 1. First, I found some mini silicone cupcake molds at the dollar store (here we call it 100 yen store).
2. I chopped up the dark brown scraps into inch-sized pieces, threw them in a ziplock bag, and mushed it all together until I had a soft, creamy consistency.
3. Then, I patted my hands with cornstarch (very little), scooped some batter out of the bag into my hands, rolled it into a ball and stuffed it into the silicone molds.
4. For what I wanted to do with the top part of the cupcake, I needed to first find a dome/ half circle mold. Again, I found this ice cube tray at the dollar/100 yen store.
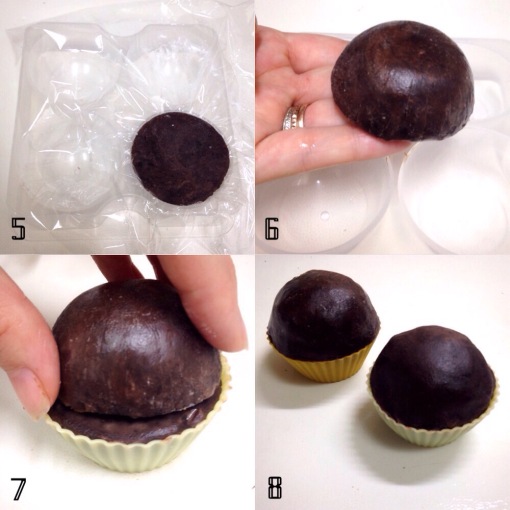
5. I covered the tray with saran wrap, scooped out some more batter from the ziplock bag, rolled it into a ball, and pressed it firmly into the mold.
6. Then, I released the batter (immediately) from the tray by pulling on the saran wrap. It should be in the shape of an ice cream scoop.
7. Next, I put the ice cream scoop on top of the base of the cupcake.
8. Here’s what it looked like. (See picture)
Now for the icing! There’s two types- 1. Leopard Bow Cupcake and 2. Purple Flower Cupcake.
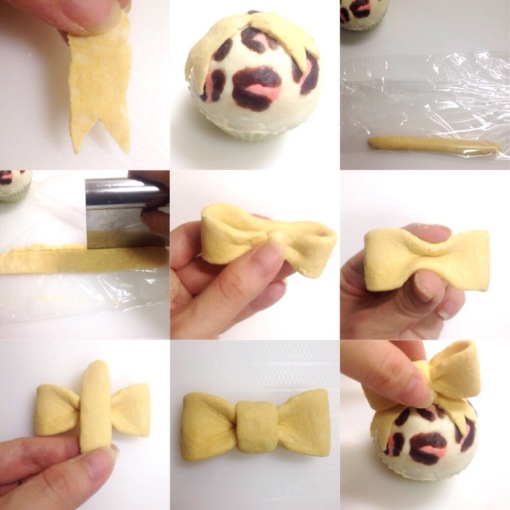
1. Leopard bow cupcake–
9. So, first I took a tiny bit of the light yellow scraps of batter from the lollipop and rolled it into a ball.
10. Then, I flattened it down to make a pancake.
11. Next, I mixed a tiny bit of WSP neon orange colorant with distilled water.
12. I took a tiny bit more of the yellow scraps, and blended some neon orange colorant mixture into it.

13. Next, I simply took bits of the now-orange batter, and pressed it into the yellow pancake soap.
14-15. After, I did the same with a little more of the dark brown scraps. Pressed it around the orange dots to make the leopard print.
16. Finally, I peeled the pancake from the saran wrap carefully, placed it on top of the cupcake, and smoothed & shaped it out with distilled water.
Here’s how I made the bow! Figured step-by-step directions aren’t necessary for this portion. Pretty much I used leftover lollipop soap and again, used cornstarch and water to help mold, shape and glue the bow.

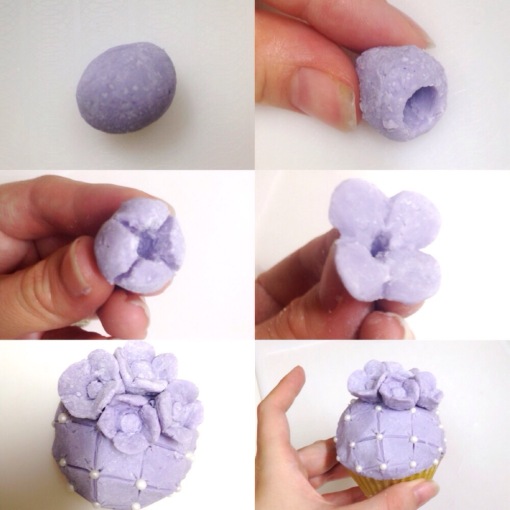
The same technique was used for the
purple flower cupcake. Again, I used lollipop leftovers and used cornstarch and distilled water. Please feel free to ask me any questions. This time I used a dough cutter to make a little design/pattern on top, added Wilton sugar pearls, and made little flowers.


Thanks for reading!! And thanks to Amy Warden and Cee Gordon for an exciting month with the Soap Challenge Club!
-Caroline
Great Cakes Soapworks Challenge- Spinning Swirl
This month, the Great Cakes Soap Challenge Club was asked to make cold process soap using the spinning swirl technique! As always, the wonderful host, Amy Warden, guided us through the challenge!
This technique was first seen here:
https://youtube.com/watch?v=wiF_udFPvcA
PREP
For this particular technique, a slow-moving recipe and a fragrance that wouldn’t accelerate was key. Usually, I’d make a recipe over 50% olive oil (not pomace) to play it safe. However, I decided to try a new recipe that included :
40% olive oil with avocado oil, apricot oil, palm kernel flakes, a little coconut oil, shea butter, mango butter and castor oil.
I was a bit nervous about the percentage of hard oils but figured if I stopped blending at emulsification using full water everything would be fine! 🙂
I also decided to test out some new colorants- WSP’s neons! And then, for black and white, I used the usual- activated charcoal and titanium dioxide.
 Since summer is coming up, a nice light citrus essential oil blend seemed appropriate :). The blend included:
Orange 15x, grapefruit, lavender and peppermint!
Special tools
-Slab mold (rectangle or square shape). My slab mold is an acrylic mold from an online shop in Japan, Cafe de Savon. 
STEPS
1. Weighed my oils, lye solution (I have a masterbatch solution that contains 50 water/ 50 lye), and extra water.
2. Melted hard oils and mixed with the soft oils.
3. Premixed my colorants using my mixed oils.
4. Mixed my oils, lye solution, and extra water at room temperature.
5. Stick-blended in short bursts until emulsified.
6. Stirred in fragrance.
7. Divided soap batter into the premixed colorants and stirred well.
8. At this point, I imitated the YouTube video above. I poured soap batter, alternating colors, in each corner of the mold. (I literally poured the batter, not just near, but into each corner).
9. After all the soap batter was poured, I spun the mold clockwise about 90 degrees at a time, just like the YouTube video. I made this spinning movement a bit strong like the force of a ticking of a clock to get the soap moving properly.
I usually take more pictures during the process but I was too focused and needed all the time I could get! I had no idea if the new blend of essential oils or recipe would cause acceleration.
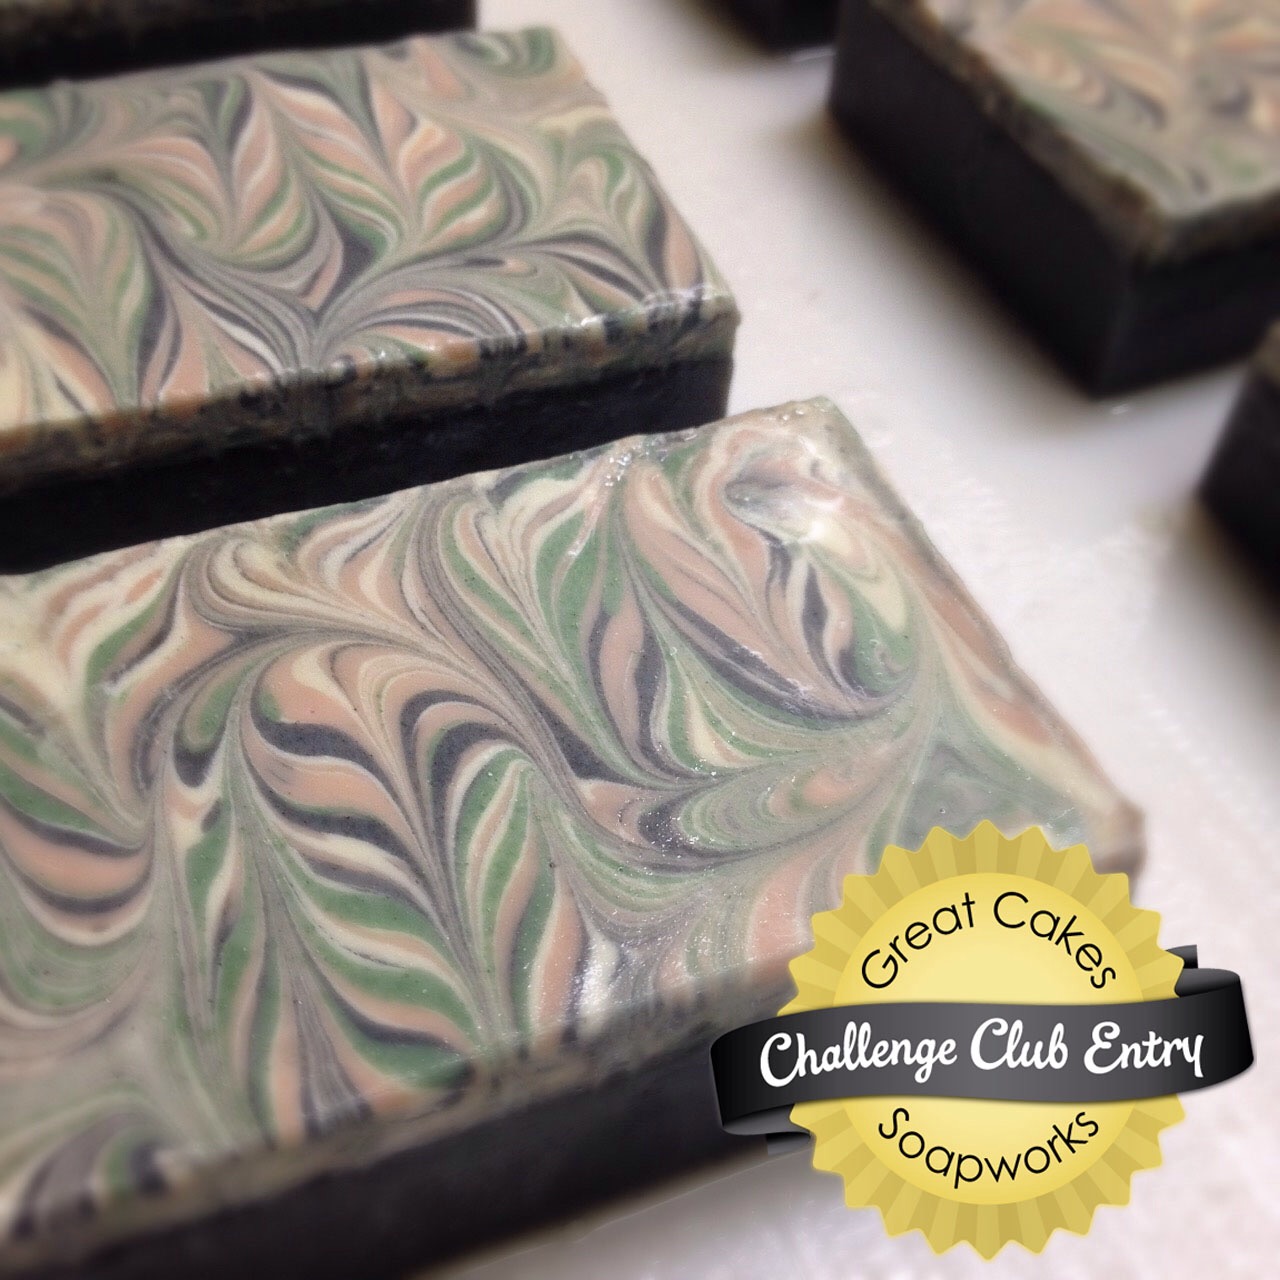
Luckily, everything went smoothly! And here are the results: 

 AFTER THOUGHTS
When planning for this, I wasn’t quite sure how much and how hard to spin the mold. And at what thickness should the batter be? I knew it had to be at very light trace but not so light or else you run the risk of colors getting muddy. But, imitating Amy Warden and the YouTube video above worked! I’m really happy with the blend of thick and thin lines!
Thanks to Amy Warden for another exciting challenge! And thanks, all, for reading!
Posted in CP soap
Great Cakes Soapworks Challenge- Landscape
With cherry blossom season coming up here in Tokyo/Yokohama, I decided my landscape soap challenge submission should include some cherry blossoms! Here is my inspiration photo:

I chose this particular photo because it looks like the trees are shedding their blossoms and the green leaves are starting to show. This is one of my favorite times to go see the cherry blossoms! It rains pink petals! And everything turns pink. It’s magical :).
I had no idea how I was going to make these cherry blossoms!! I actually have a small half-inch cookie cutter of a cherry blossom but thought it’d be fun to come up with another way to make them without embeds.
So here’s what I did!
PREP
Slow-moving recipe:
50% olive oil, apricot oil, avocado oil, shea butter, castor oil
Cherry blossom fragrance from WSP
Special tools:
Five squeeze bottles
Skewer (to swirl top)
STEPS
MP
1. Made tree trunk/branch embeds using MP soap & cocoa powder. Set aside.

—————————————-
CP
1. Stick-blended melted oils until emulsified (not to trace!).
2. Divided soap into five squeeze bottles added a pre-made colorant (colorants mixed with a bit of oil) to each (cocoa powder, neon pink, rose clay, green pigment chromium oxide, TD).


3. Filled log mold half way full with neon pink, rose clay and TD using dots and lines.
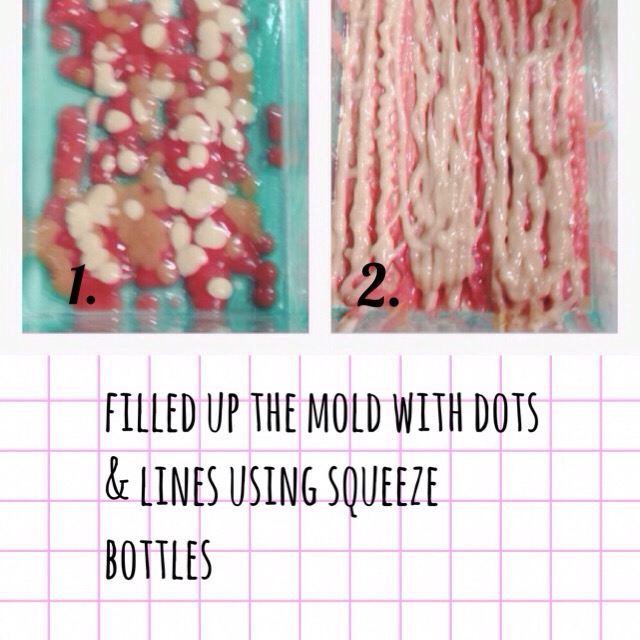
4. Placed MP embeds in mold. These were long enough to be suspended in place by the pressure of ends of the acrylic mold. In other words, the soap was too soft to hold these in place. It definitely needed to be sort-of lodged in place :). The other option would be to wait until the CP thickened.
5. Filled the rest of the mold in the same manner while adding in the brown and green.
6. Swirl top with skewer.
 And here we are!

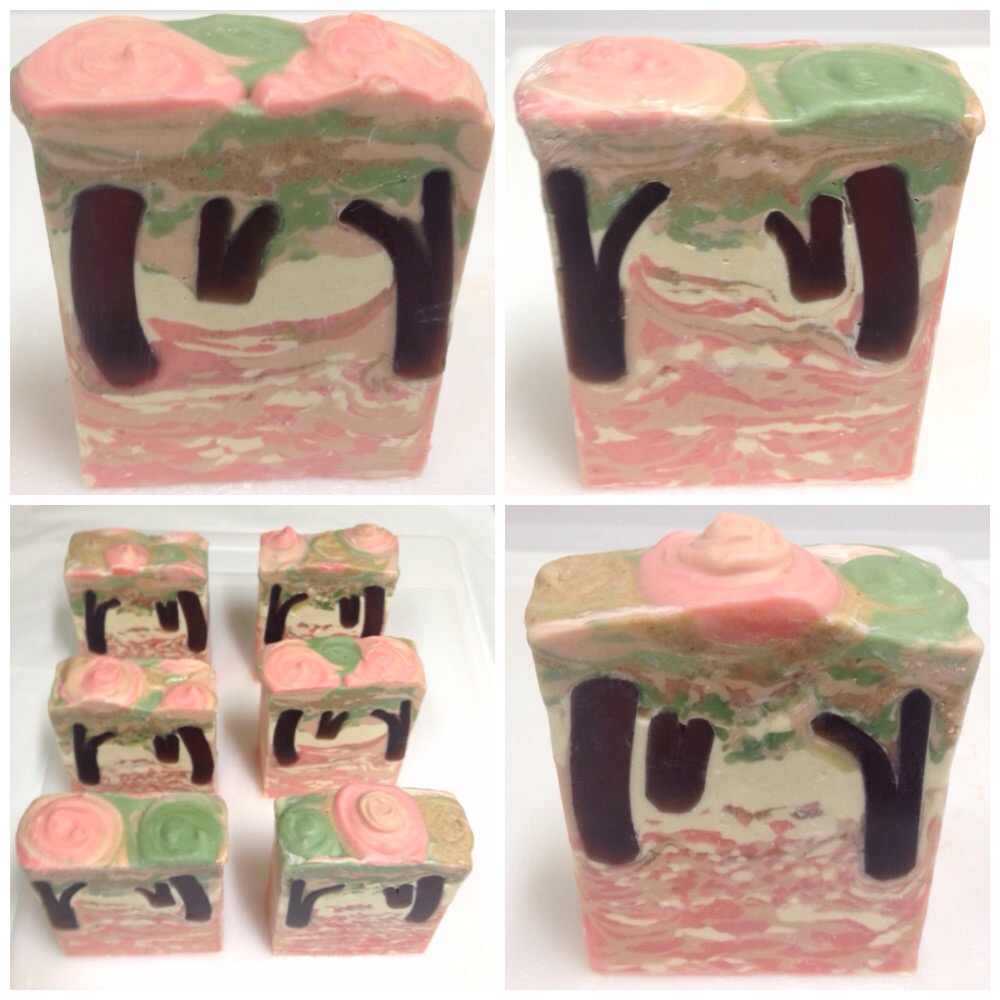
This one has the sunlight coming from the back. You can see that the branches are actually lighter brown.

Thanks once again to Amy Warden for
hosting the challenges every month. And thanks to readers and soapers for inspiration!
Posted in CP soap, Uncategorized
Cafe de Savon Acrylic Molds and Soapmaking Supplies
Cafe de Savon (a popular Japan online soap shop)
Recently I’ve been asked by many soapers about Cafe de Savon’s acrylic molds. Even though translated, Cafe de Savon’s global rakuten shop might be hard to navigate if you can’t read Japanese. So here’s my attempt at helping those soapers who are interested.
LOG MOLDS / LOAF MOLDS
There’s 3 basic sizes for log molds (first link under each is the full set including the extra plate. And the second, is without the plate. I’d recommend the plate set in order to push out the soap neatly):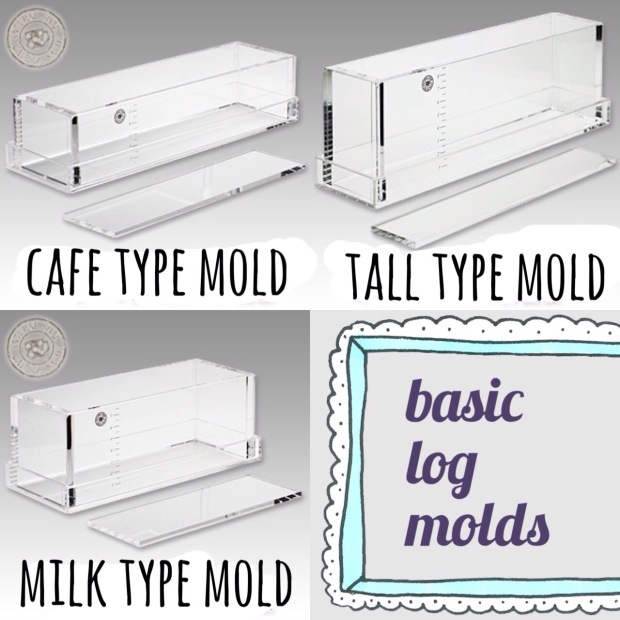
1. Cafe mold-
Inside dimensions: 9.8 inches (L) x 2.6 inches ![]() x 2.4 (H)
x 2.4 (H)
http://global.rakuten.com/en/store/cafe-de-savon/item/a1081201/?s-id=borderless_browsehist_en
http://global.rakuten.com/en/store/cafe-de-savon/item/a1081202/?s-id=borderless_browsehist_en
2. Milk mold–
Inside dimensions: 7 5/8″ (L) x 2 5/8″ ![]() x 3 (H)
x 3 (H)
http://global.rakuten.com/en/store/cafe-de-savon/item/a1081203/?s-id=borderless_browsehist_en
http://global.rakuten.com/en/store/cafe-de-savon/item/a1081204/?s-id=borderless_browsehist_en
3. Tall mold–
Inside dimensions: 9.8″ (L) x 1.8″ ![]() x 3.3″ (H)
x 3.3″ (H)
http://global.rakuten.com/en/store/cafe-de-savon/item/a1101201/?s-id=borderless_browsehist_en
http://global.rakuten.com/en/store/cafe-de-savon/item/a1101204/
There’s also half size molds of each style. These are great for test batches or making soap for personal use.
1. Cafe half size mold:
http://global.rakuten.com/en/store/cafe-de-savon/item/a1081206/
http://global.rakuten.com/en/store/cafe-de-savon/item/a1081208/
2. Milk half size mold:
http://global.rakuten.com/en/store/cafe-de-savon/item/a1081207/
http://global.rakuten.com/en/store/cafe-de-savon/item/a1081209/
3. Tall half size mold:
http://global.rakuten.com/en/store/cafe-de-savon/item/a1120501/
http://global.rakuten.com/en/store/cafe-de-savon/item/a1120502/
LONGER MOLD
“More type” mold:
(this one is longer than the basic molds above)
15.7″ x 2.4″ x 2.4″
http://global.rakuten.com/en/store/cafe-de-savon/item/a1110501/
http://global.rakuten.com/en/store/cafe-de-savon/item/a1110502/
SLAB MOLD
Brownie mold:
6 4/8″ (H) x 6 4/8″ (L) x 2 1/8″ (H)
http://item.rakuten.co.jp/cafe-de-savon/a1131201/
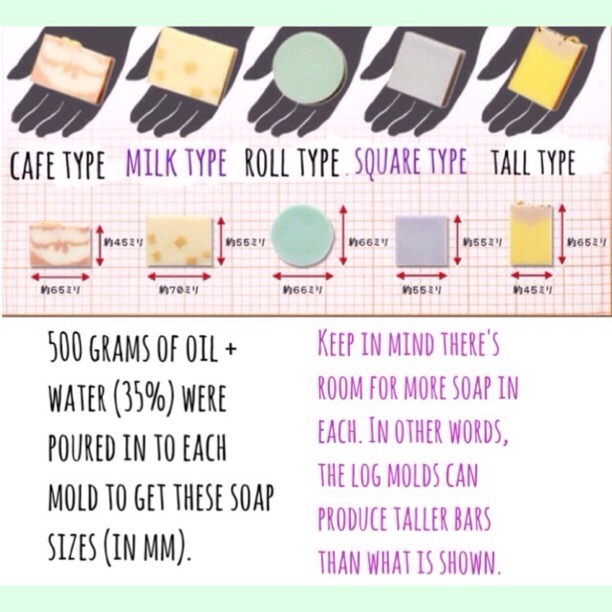
THOUGHTS
I have the milk, tall and brownie mold. I love the milk mold the best :). It’s the widest of the log molds and I fill the soap up all the way to the top to maximize the space. I think the skinny mold produces soaps that feel a bit like guest-size soaps. Still nice to have! The brownie mold is great as long as you’re ok with the size. You can get 4-6 bars decent sized bars depending how you cut. I didn’t care to buy the cafe mold because it was less wide than the milk mold.
ACCESSORIES
Styrofoam cube:
This helps push the soap out of the mold
http://global.rakuten.com/en/store/cafe-de-savon/item/a1110503/
It definitely helps! You’ll want something to help evenly push out your soap. I’m sure you can just cut out some styrofoam to fit or find something else will help push it out. It was less than $2 so I just bought it and def don’t regret it!
Should I buy the mold with or without the extra plate?
As an example, this “milk type” log mold includes the plate: http://global.rakuten.com/en/store/cafe-de-savon/item/a1081203/
And this one doesn’t include the plate: http://global.rakuten.com/en/store/cafe-de-savon/item/a1081204/
I’d go with the mold that includes the plate. So after you make your soap and after gel/ or 24 hrs later, you remove the bottom tray (and Saran Wrap), and you place that plate underneath the soap and cube underneath the plate to push the soap out. So the cube isn’t touching your soap when pushing out. The cube pushes on the plate which evenly and nicely pushes out the soap. It’s nice and simple (even if I make it sound complicated)! Pretty much the plate helps not dent or harm your soap while pushing it out and fits perfectly. I included some YouTube videos (not my YouTube videos, videos I’ve found) to help understand the process and to show the products better). (See bottom of the page)
Acrylic mold handles: http://global.rakuten.com/en/store/cafe-de-savon/item/a1091106/
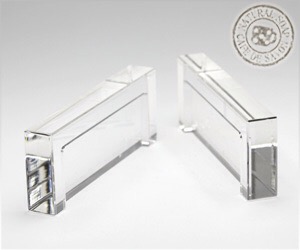
They’re suppose to be for the “Milk type” or “cafe type” log molds. Looks like you’re suppose to attach them to each end to help have a better grip while pushing out the soap. I don’t think this is necessary at all but reviewers love them! (See first YouTube video link at the bottom of the page)
Other soaping items that I love :)-
Soap cutter items:
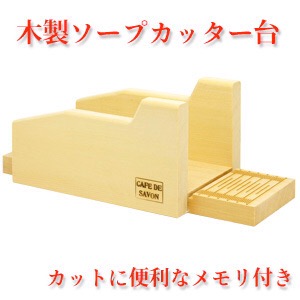
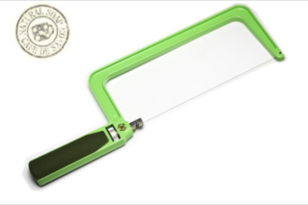
http://global.rakuten.com/en/store/cafe-de-savon/item/f3081202/
http://global.rakuten.com/en/store/cafe-de-savon/item/f3090601/?s-id=borderless_recommend_item_en
To mix lye solution: http://global.rakuten.com/en/store/cafe-de-savon/item/s1091107/
I have a big container with my masterbatch lye solution and use this one to measure out some of the solution for each use. I love the lid! No spillage! 🙂
Alphabet stamp: http://global.rakuten.com/en/store/cafe-de-savon/item/f3140803/?s-id=borderless_browsehist_en
Posted in Uncategorized
Great Cakes Soapworks Challenge- DNA Helix Swirl
This month, as part of the Soap Club Challenge, Amy Warden (Great Cakes Soapworks) definitely challenged us with the DNA Helix Swirl technique. Let me tell you, this technique was much harder than it seemed!
PREP
1. Mixed oils together. Olive oil made up 60% of my recipe. The rest included rice bran, macadamia oil, palm kernel oil, coconut oil, and castor oil.
2. Using a mini-mixer, I blended colorants with a bit of oil from my combined oils. Decided to go with the following colorants: TD, green liquid pigment/ chromium oxide, rose clay, purple ultramarine powder, and activated charcoal. I wanted my base/bottom layer to be black (activated charcoal).

Special tools: Ketch-up or squeeze bottles and chopstick or skewer.
STEPS
2. At thin trace, I divided the soap to color. More than half was colored with activated charcoal for the base. And the rest was divided, colored and transferred into squeeze bottles.
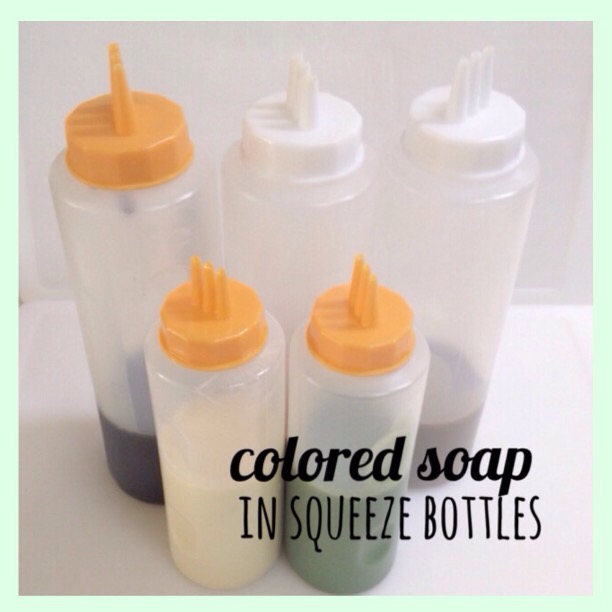
3. Next, I poured the black colored soap into the mold.

2. Then, I used the squeeze bottles to lay the rest of the colored soap on top of the base in horizontal lines.


3. Then, with a skewer, I followed this pattern:
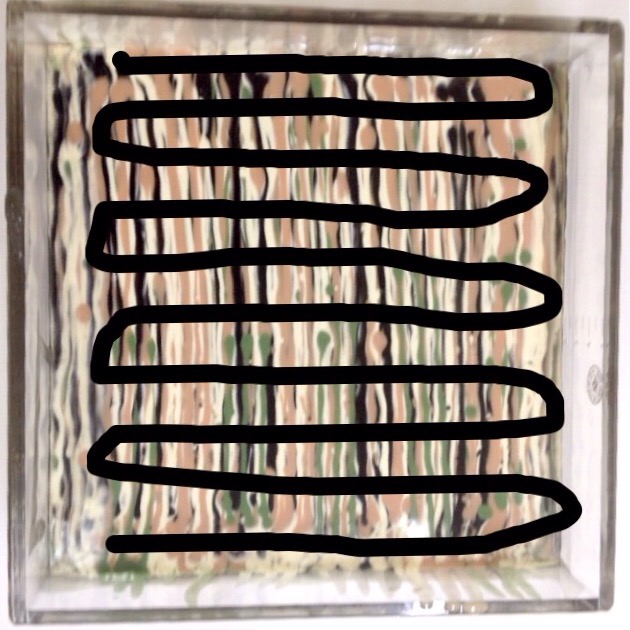
The results should look something like this:


4. Finally, the hardest part, in my opinion- the vertical s-like pattern:

One line at a time, like this (only neater 🙂 ):
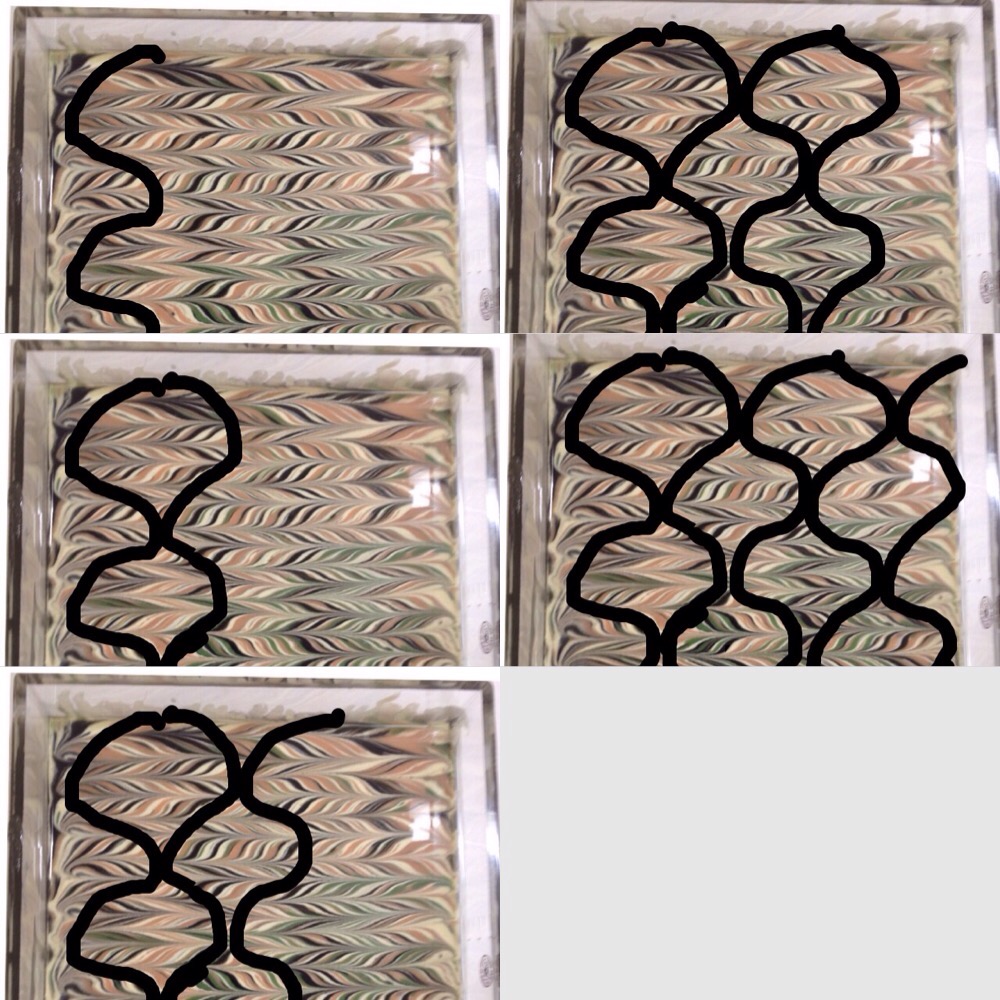
And TADA!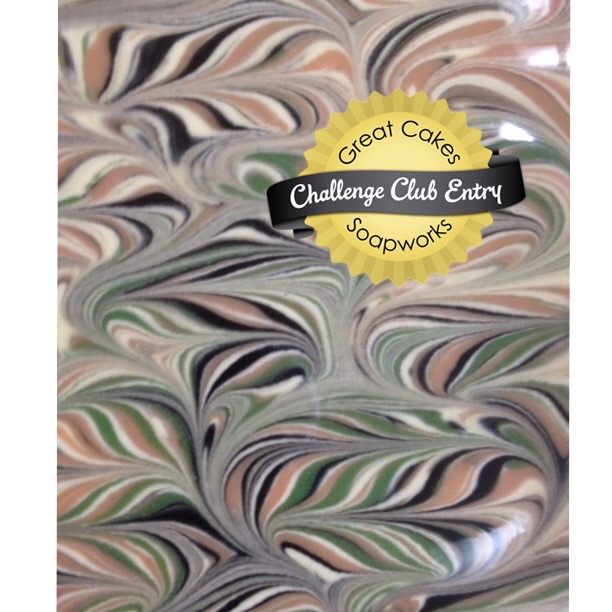

Well, it’s not perfect! Hehe. I could’ve made my the s-pattern lines more uniform. But, I do like the colors! And using the green on half of mold turned out pretty interesting.

Next time, I’ll probably play with that idea. Maybe bring in-and-out colors?
Thanks for reading! And a big” thank you” to Amy Warden for hosting a wonderful club challenge every month!!
Can’t wait until the next challenge! 🙂 Until then, I started some dessert soap! Made some pie crust and about to top these donuts off with some icing and sprinkles! 🙂


Posted in CP soap
