When Amy Warden announced that this month’s soap challenge was going to be mini desserts, I didn’t know how to feel. On one hand, it was foreign territory to me. On the other, there were so many techniques I was dying to try. And I knew this was going to give me the motivation to do so!
Before I begin, I wanted to say I was very inspired by many amazing dessert recipe books out there. I’ll post a separate blog about it. For this challenge, I tested many techniques presented by queen of sweets soaper, Kosaka Yukiko.
So I’m going to start by posting some pictures of my four mini dessert submissions first since the documentation of the process will probably be lengthy (and some of you might not want to read all the details). I will say that I tried incorporating many techniques such as the mp dough, cp kneading, cp whipping, etc. This challenge was four-in-one in my opinion!
Here are my desserts: 1) Checkered chocolate coffee cake, 2) Lollipop 3) Apple kiwi tart and 4) Purple pearl flower cupcake-
1. Checkered Chocolate Coffee Cake
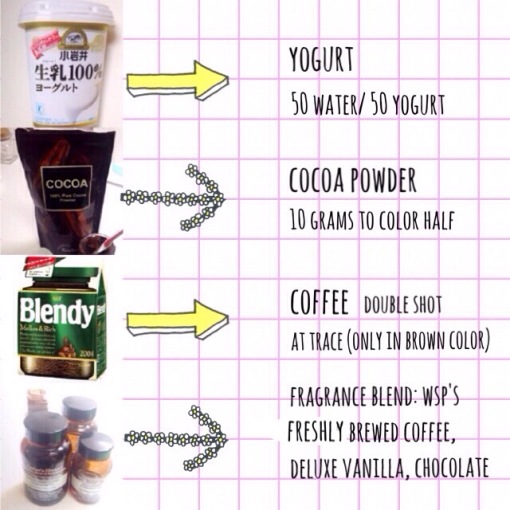
(With yogurt, two shots of coffee, and cocoa powder)
2. Lollipop
(With yogurt)

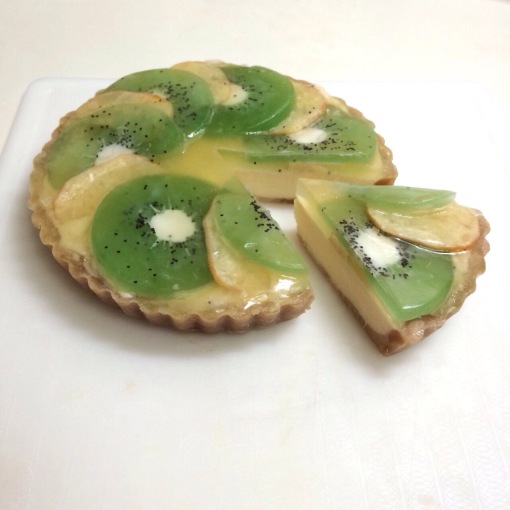
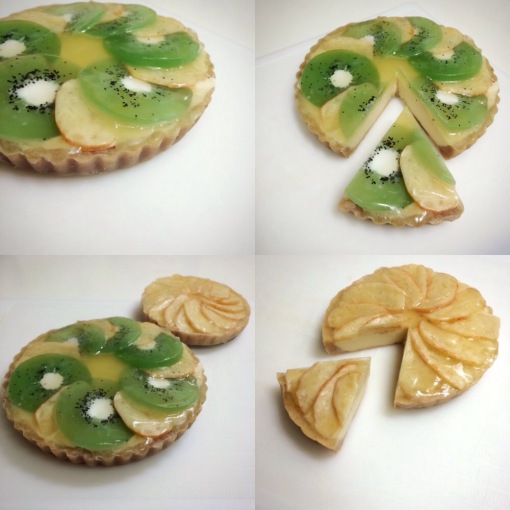
3. Apple Kiwi Tart
(With yogurt, tumeric, coffee, cocoa powder)
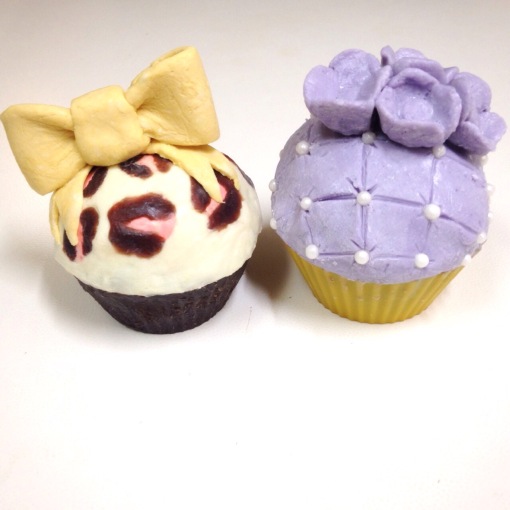
4. Purple Pearl Flower Cupcakes (With yogurt, coffee, cocoa powder, sugar)
Here’s another cupcake I made- Leopard bow cupcake. (Although the purple cupcake above is part of my challenge submission).
Edit 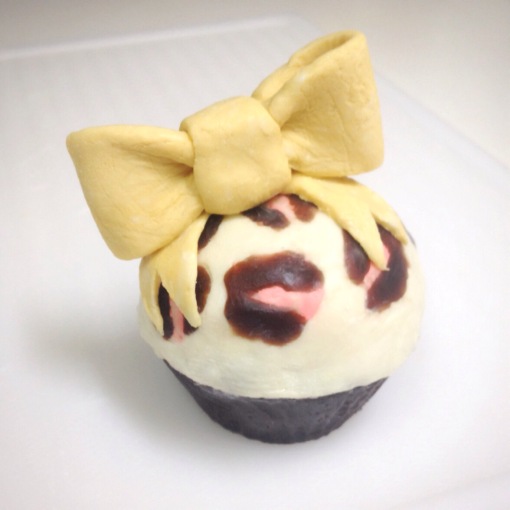
And now for the process!
STEPS
FRUITS
I started by making the toppings aka fruits- strawberries, kiwi, and apples.
STRAWBERRIES
Strawberries were made of fondant mp soap, and dipped into mp clear soap.
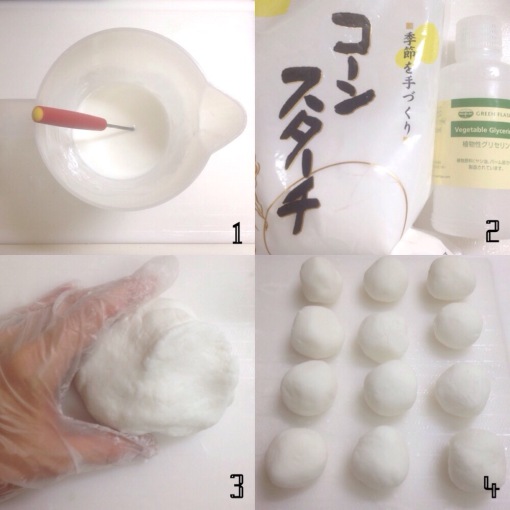 1-3. First I started by making the fondant mp soap using white mp soap, cornstarch, and glycerin. Cee Gordon, our teacher for this month’s challenge, kindly gave us a starting-point recipe. I ended up using a bit more cornstarch to get the consistency that I wanted.
4. While occasionally patting my hands with cornstarch, I rolled the fondant soap into balls (strawberry-size). 5-6. I, then, shaped each ball into a strawberry and with a skewer I poked holes into each.
7-8. Finally, dipped each strawberry into clear red mp soap.
Notes: I think I would’ve been better off molding cp soap, dipping it in red mp soap, then poking holes. The fondant mp soap was a bit too soft (cp would’ve been easier to keep shape while poking holes). Also, originally I wanted to cut the strawberries in half which is why I left the middle white (only colored the outside). But if you’re keeping them whole it might be nice to just make the strawberry completely red.
KIWI
The kiwi was made of clear mp soap, poppy seeds, and mp fondant “play dough” soap.
 1. First, I poured some green (chrome pigment scented with fruit slices, a sample I received from Peak Candles) clear melt and pour and poppy seeds in a silicone mold.
2. Then, after the chrome green mp soap hardened, I cookie cut some circles out.
3. I, then, punched out the center of these circles with a smaller circle cookie cutter.
4. With a skewer, I engraved some lines from the center outwards (as is you were drawing rays of the sun).
5-6. I took some fondant mp soap used to make the strawberries above to fill in the center holes. (Rolled then in little balls and pressed them in the holes and spread them outwards in order to see the “rays”).
7-8. Pressed some more poppy seeds right outside of the white center.
Notes: I googled kiwi images after I made these and realized the seeds shouldn’t have been scattered all over the kiwi just close to the center :)! Oopsy!

APPLE
The apple was made with a day old CP soap, tumeric and red liquid pigment.
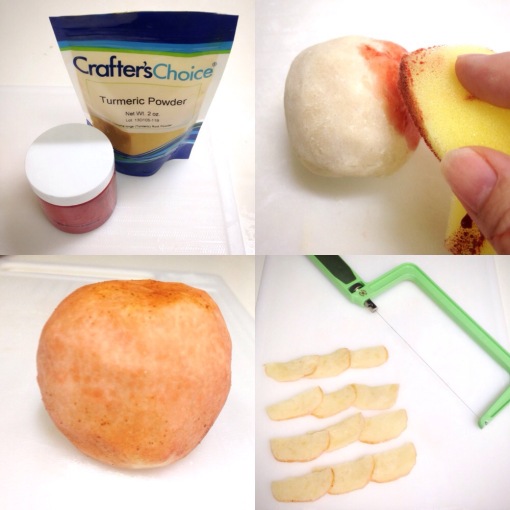 1. I rolled the day-old CP soap into the shape of an apple.
2. First, I dipped a sponge into red liquid pigment and dabbed it on the apple. Then, I dipped the sponge into tumeric (which was mixed with distilled water) and dapped it on the bottom and top part of the apple.
3. Then with a wire cutter, sliced the apple.
Chocolate Checkered Coffee Cake
 1. First, I had to find three circle cookie cutters -small, medium, and large- that were the same length/diameter apart (mine were 33mm, 63mm and 93mm).
I split my cp batter (which I added yogurt at trace) into two and colored one side dark chocolate with coffee and cocoa powder and the other with a touch of neon yellow and orange. Then, put fragrance blend in dark chocolate side only. Poured each into a silicone mold.
Day 2.
2. I used the largest cookie cutter to make two circles from each color. Made the height of each 15mm circle.
3. Then, using the medium cookie cutter, I punched a circle out of each large circle, making sure it was centered.
4. Next, used the small cookie cutter to punch a hole in each medium circle, making sure it was centered.

5. I put the pieces back together but alternating colors. (See #5 pic).
6. Then, stacked the four pieces, again, alternating colors. I made sure there weren’t any gaps between any pieces by pressing firmly but carefully and using distilled water to help glue. Of course, used gloves (lye!).
7. I put some of the remaining day-old chocolate scraps into a ziplock bag and mushed or kneaded it until it was a creamy texture. Added distilled water to help.
8. Finally, I scooped out the cream, spread it over the stack of circles, and added strawberries.
Notes: Pressing firmly and making sure there’s no gaps during step 5 and 6 is key!
Lollipop
To make this lollipop, I used 50/50 water/yogurt as my liquid. Cornstarch, distilled water, and a paintbrush came in handy.
So I split my batch four ways, colored with neons, and waited two days to start—>

1. Rolled each color into a ball to make sure texture was even and also to get an even amount of each color. I put a bit of cornstarch on my hands to help with the stickiness.
2. Then, flattened and rolled each color.
3. Pressed each colored roll together.
4. Painted distilled water on the merged roll and twisted the roll slowly and carefully.
5-6. Curled the twisted roll until in the shape of a lollipop.
And finally pushed in the lollipop stick.
Notes: This was definitely harder than it looked! It was a balance of cornstarch and water. One moment it would be too sticky and break… and other times it’d be too dry to mold. I’m thinking if I waited a few more days to knead the cp soap it might’ve been a lot easier. Also, I’m sure recipe matters as well. After a bunch of tries, though, I started getting a grip on it ;).

Apple Kiwi Tart
The apple kiwi tart is made of two fruit (mp kiwi and cp apple-instructions above), the crust (two-day-old cp soap), filling (cp soap), and the mp glazed topping.
CRUST
The crust is made of two-day-old cp soap which contains yogurt, cocoa powder, coffee and tumeric.

1. I wanted to go for the blotchy, graham cracker look for the crust. So I used some scraps of the dark chocolate brown two-day-old cp soap from my checkered cake as well as some yellow two-day-old cp soap from checkered cake. I took both and rolled them into one ball.
2. Then, I flattened the ball, rolled and coiled the cp batter, and put it in a mini tart pan (which was covered in saran wrap).
3. Then, I pressed firmly to cover the entire pan.
4. I lifted the crust out of the pan by carefully pulling on the saran wrap. It slipped right out!
FILLING & TOP
5. After the crust was made, I poured fresh cp soap on top at thick trace.
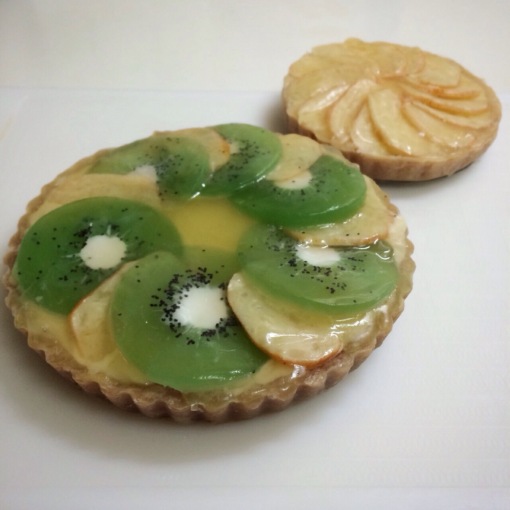
6. By the time I gathered the kiwi and apple slices, the filling was ready to be topped. I alternated between the kiwi and apple slices.
7-8. Then, I poured a coating of lightly colored clear, yellow mp soap on top to get that glazed look.
And the apple tart in the background was made from leftovers ;).
Notes: I shouldn’t have released the crust from the pan until the end! That way, if the mp soap coating drizzled off the edges, I wouldn’t have to peel it off the crust :).
CUPCAKES
The base of the cupcakes were made from the dark brown scraps from the checkered cake which included coffee, cocoa powder, and yogurt. The icing was made of leftover lollipop batter which included yogurt. Side note: by now the scraps were about 5 days old and molded much better than the one-two day old soap.
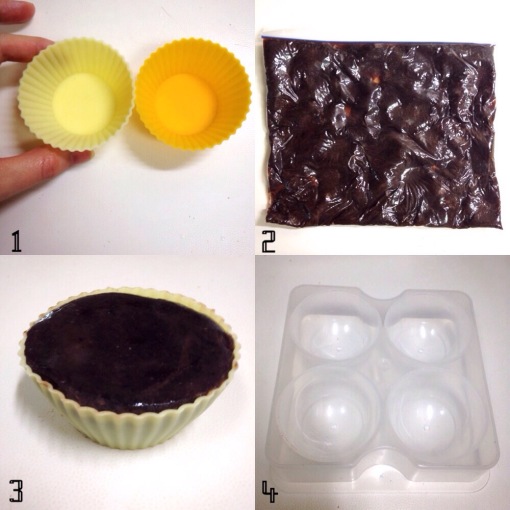 1. First, I found some mini silicone cupcake molds at the dollar store (here we call it 100 yen store).
2. I chopped up the dark brown scraps into inch-sized pieces, threw them in a ziplock bag, and mushed it all together until I had a soft, creamy consistency.
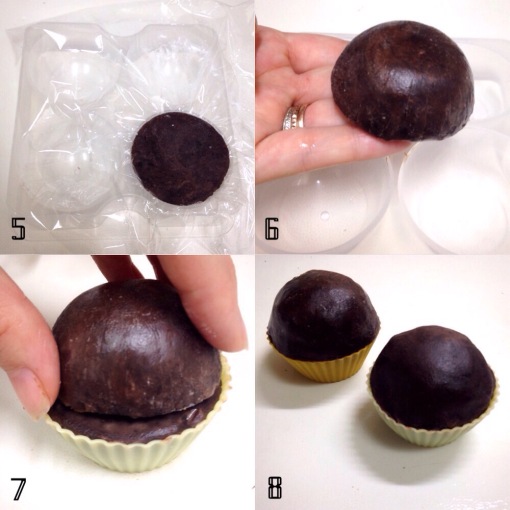
3. Then, I patted my hands with cornstarch (very little), scooped some batter out of the bag into my hands, rolled it into a ball and stuffed it into the silicone molds.
4. For what I wanted to do with the top part of the cupcake, I needed to first find a dome/ half circle mold. Again, I found this ice cube tray at the dollar/100 yen store.
5. I covered the tray with saran wrap, scooped out some more batter from the ziplock bag, rolled it into a ball, and pressed it firmly into the mold.
6. Then, I released the batter (immediately) from the tray by pulling on the saran wrap. It should be in the shape of an ice cream scoop.
7. Next, I put the ice cream scoop on top of the base of the cupcake.
8. Here’s what it looked like. (See picture)
Now for the icing! There’s two types- 1. Leopard Bow Cupcake and 2. Purple Flower Cupcake.
1.
Leopard bow cupcake–

9. So, first I took a tiny bit of the light yellow scraps of batter from the lollipop and rolled it into a ball.
10. Then, I flattened it down to make a pancake.
11. Next, I mixed a tiny bit of WSP neon orange colorant with distilled water.
12. I took a tiny bit more of the yellow scraps, and blended some neon orange colorant mixture into it.
13. Next, I simply took bits of the now-orange batter, and pressed it into the yellow pancake soap.
14-15. After, I did the same with a little more of the dark brown scraps. Pressed it around the orange dots to make the leopard print.
16. Finally, I peeled the pancake from the saran wrap carefully, placed it on top of the cupcake, and smoothed & shaped it out with distilled water.
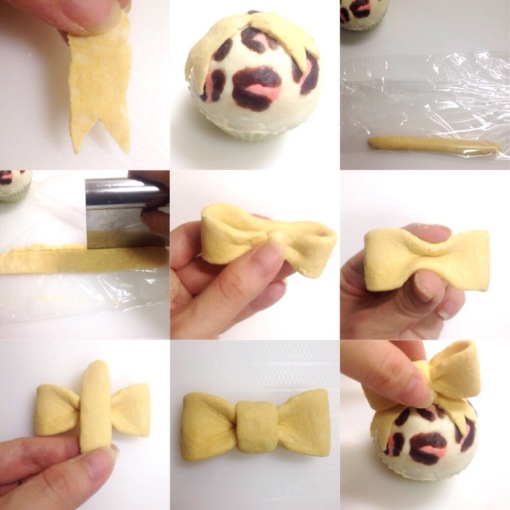
Here’s how I made the bow! Figured step-by-step directions aren’t necessary for this portion. Pretty much I used leftover lollipop soap and again, used cornstarch and water to help mold, shape and glue the bow.

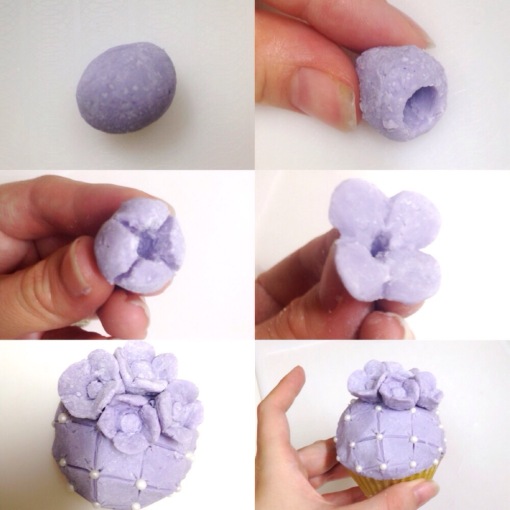
The same technique was used for the
purple flower cupcake. Again, I used lollipop leftovers and used cornstarch and distilled water. Please feel free to ask me any questions. This time I used a dough cutter to make a little design/pattern on top, added Wilton sugar pearls, and made little flowers.

Thanks for reading!! And thanks to Amy Warden and Cee Gordon for an exciting month with the Soap Challenge Club!
-Caroline